How to Start a Blog in 2021: Beginner’s Guide to $203k in a Year

If you want to learn how to start a blog like a real business owner and not a hobbyist, you’ve come to the right place.
With millions of bloggers out there, a lot of people think that it’s too saturated to make money blogging in 2020.
I created this blog AdamEnfroy.com just last year (2019) as a case study to prove that you can start blogging right now and make significant money in months, not years.
You just need the right business tactics. And you need to scale.
So why should you follow my advice on how to start a blog?
- I launched this blog in January 2019, and today I make over $80,000/month.
- This blog got to 500k monthly visitors just 18 months after launch.
- The tactics I teach aren’t from old school bloggers but from startup content teams.
- I’ve failed a lot of times in the past and genuinely want you to succeed. So much blogging advice out there is outdated, and 95% of blogs are still failing – I want to change that.
This ultimate guide for beginners will cover how to choose the right niche, launch your site with WordPress, generate traffic, and monetize your site in the fastest timeframe possible – all while working full-time.
No
It is also very different from other articles you’ll find when you Google “how to start a blog.”
Most of those articles were written 5-10 years ago to appeal to a broad audience and get the most traffic.
This article provides content you won’t find anywhere else, including:
- Why you need to choose your own name as your domain name.
- Why you only need to write two types of blog posts to make money.
- Why you need to focus less on writing and more on link building.
- How you can build a massively profitable blog without writing at all.
- And much more.
Ultimately, I’m going to teach you the same tactics I used to grow my blog from zero and make enough money to quit my job in six months.
Disclaimer: Please note that this post includes affiliate links which may provide a commission to me at no cost to you. However, the links are for the best software and tools you need to start a successful blog. For more information, you can read my affiliate disclosure in my privacy policy.
How to Start a Blog in 11 Easy Steps.
1. Choose Your Blog’s Niche.
The first step to starting a blog is to get started with Bluehost. Use my link and get started for just $2.95/month (63% off your hosting plan).
We all know that your blog needs a niche – whether it’s marketing, cooking, Crossfit exercises, vegan dogsitting, underwater parkour solo dancing – whatever crazy blog topic, there are an endless amount of things to blog about.
Most professional bloggers will tell you to start with something that you’re passionate about because it helps you “maintain a consistent writing schedule and push through failure to succeed.”
They’ll also tell you to choose a niche at the intersection of passion, skills, and experience:
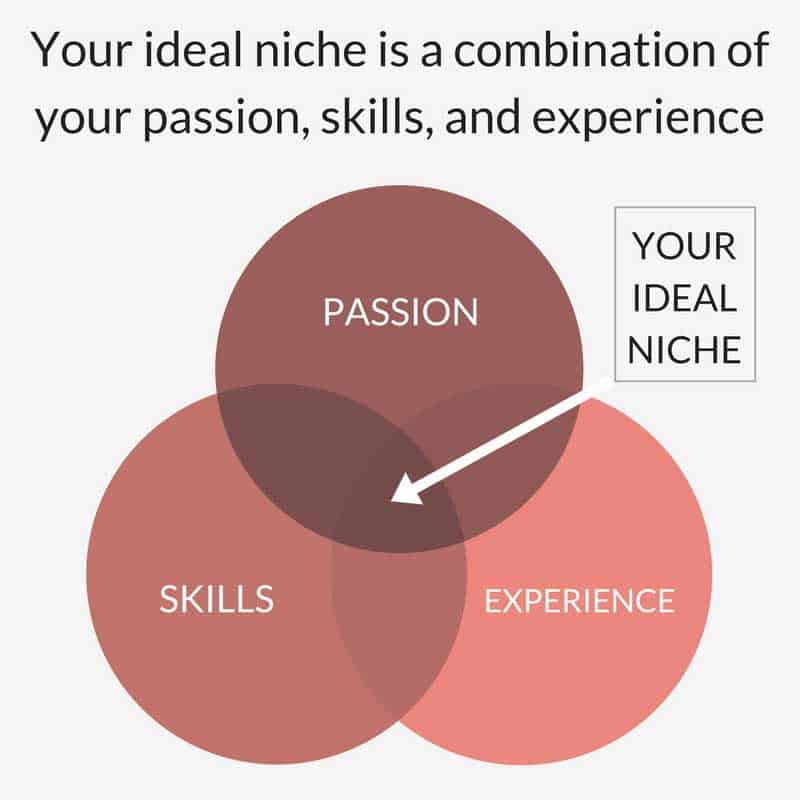
Source: mintnotion.com
However, this model is flawed because it’s missing one major component: monetization.
I firmly believe that with a blog, money drives passion more than passion drives money.
I could blog about my passions, skills, and experience for a while, but if I wasn’t gaining any readers or making any money, I’d quit 100% of the time.
And that’s why most blogs fail.
Bloggers don’t know how to transition from blogger to business owner.
Then they say their blog is “just a hobby” and give up on their dreams.
So we’re going to flip the script and learn how to start a blog like a business from day one.$
To do that, we have to choose the perfect niche, right?
Not at first.
The odds of choosing the perfect niche when you are just starting as a beginner are infinitesimally small.
Here’s why you need to choose your own name as your domain name:
- You give yourself the freedom to pivot.
- You can test new content ideas and choose your niche over time.
- Bloggers make money selling information. People buy from people. People trust people. Authenticity sells.
- You build real influence on a platform that you own.
- Your blog becomes a digital resume, a launching off point, a website that builds professional experience and leverage.
Choose your name and move on.
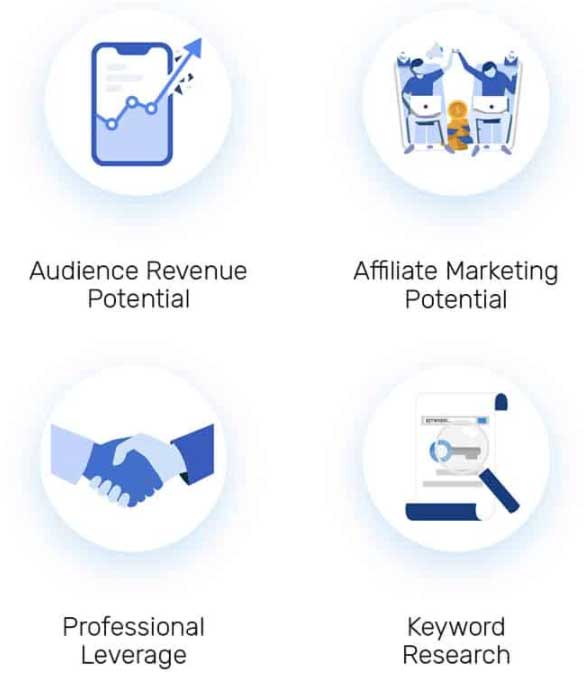
Once you do this, we’ll choose your ideal niche not based on passions, but on four primary business factors:
- Audience Revenue Potential
- Affiliate Marketing Potential
- Professional Leverage
- Keyword Research
1. Audience Revenue Potential.
When you’re starting a new blog, the most common question is, “What should my niche be?”
The key is to find an area that you understand and solve a pain point for your audience.
However, you not only need to solve a pain point – you need to solve a pain point that an audience is willing to spend money on.
As a blogger, you need to understand your audience’s challenges deeply so that you can offer them exactly what they need.
And the best place to start is by looking at yourself.
Ask yourself, “What audiences am I a part of?”
You’re far more likely to understand a specific group’s struggles if you’ve encountered them yourself.
Take my blog, for example.
When I started this blog, I was a 31-year old American male working in the tech industry.

I was putting in long hours, sacrificing time with my family and friends, and getting stressed and burned out by the rat race.
So I created this blog as a means to an end – a way to make passive income, escape my 9-5 and take back control of my time – and my life.
So my target audience was people similar to me:
- 25-45 years old.
- Working 9-5 but want to escape the rat race.
- Ready to hustle and put in the work.
- Smart and technically savvy.
- People who want to make passive income through a blog.
Understanding your audience is the first step.
The second (and equally important) step is to understand how much your audience is willing to spend to solve their pain points.
This is your audience revenue potential.
This bears repeating: you need to understand your audience AND how much they’re willing to spend on your solution.
Source: successunscrambled.com
For example, let’s say you’re planning to start a blog about human resources and job tips for Millennials.
Your blog posts may pull in different types of readers, including job seekers, working professionals, and college students.
To monetize a blog in this niche, let’s say you create a sales funnel:
- You write new content to attract an audience online.
- Next, you build a “job interview checklist” lead magnet to generate email opt-ins.
- Third, you place affiliate links to some products you want to promote.
- Finally, you offer a $300 product titled “The Ultimate Job Interview Preparation Online Course.”
Nothing is wrong with this approach.
This tends to be a common approach for most new bloggers. If you were to put in a few years of content creation and building up your email list, I estimate you could start making a passive income in 2-3 years.
However, by slightly altering your potential niche, you drastically increase your blog’s income potential.
All you do is change your target audience from job seekers to job employers.
Let me explain.
By adding a B2B component to your blog, you shift your audience from individuals to businesses.
Businesses have larger bank accounts and are more likely to pay you without hesitation.
The beautiful thing about this approach is that your blog launch, content, and marketing funnel are pretty much the same. However, with the B2B component, you don’t just stop at a $300 course. You can add the final component of 5-figure online consulting.
Rather than writing a blog post on entry-level interview tips, position yourself as an expert and go after the businesses themselves by offering something like HR audits or onboarding consulting for thousands of dollars per month.
When you’re just starting out and traffic is hard to come by, offering consulting services is a great way to generate more income with less traffic.
It’s simple math: If your new blog has 100 visitors a 2% conversion rate, your two sales should be for thousands, not $19.99.
Instead of focusing on adding affiliate links and ads to your site when you have little traffic at the beginning, see if you can come up with a high-end consulting offer to build momentum and make money right out of the gate.
Remember, just understanding your audience’s pain points isn’t enough.
To improve your revenue potential, a portion of your audience needs to be in a lucrative business niche and pay on a monthly recurring basis.
With this approach, I hope you’re beginning to understand why I truly believe you can make $10,000/month in 90 days with a new blog.
These new funds will be used to accelerate your path to passive income, but we’ll leave it at that for now.
Let’s move onto something I’m very passionate about – affiliate marketing.
2. Your Niche Needs Affiliate Marketing Potential.
Affiliate marketing is my favorite form of blog monetization. It’s the most passive, and once you start getting traffic, you can make money while you sleep.
Affiliate marketing is the act of recommending products and services of other businesses and making a commission on every sale.
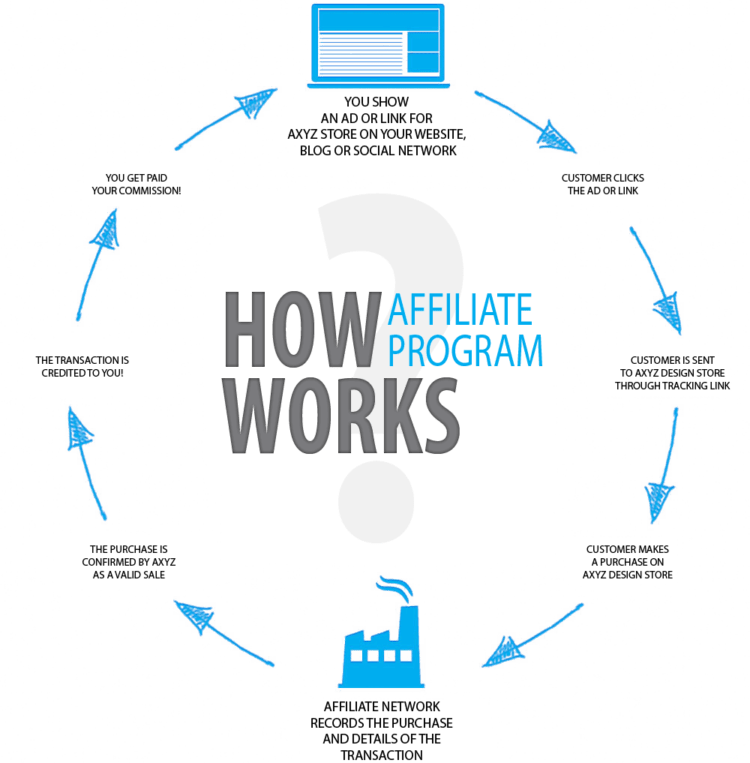
Source: affiliatemarketingtraining.com
Most large companies have affiliate programs you can join. Once you apply and are approved into their programs, you can grab your unique affiliate links to add to your blog, view reporting on clicks and sales, and see any future payouts you’re scheduled to receive.
Here are some steps to get started with affiliate marketing:
- Apply to a company’s affiliate program either on their site or in an affiliate network. For this, you’ll need a website and an email address from your domain – not just a Gmail or Yahoo email.
- Once approved, grab your unique affiliate link and copy/paste it into any piece of text on your blog.
When a user clicks that specific link, a cookie is stored in their computer, which credits the sale to you based on the cookie duration – typically 30, 60, or 90 days.
Now, when you think of the word blogging, what comes to mind?
- Maybe it’s lifestyle blogs writing about what they’ve been purchasing for their family lately.
- Or a fitness blogger that’s giving you some great advice on how to lose weight.
- It could even be an interesting person writing their own personal memoirs.
I want you to forget about these types of blogs.
They may be interesting to read, but they aren’t the niches that will bring you the most revenue.
Instead, consider this simple formula.
- To make a lot of money blogging, you need affiliate income.
- To make affiliate income, you need to rank on search engines and get web traffic.
- To get web traffic, you need to rank for keywords that drive the most affiliate revenue.
So what are these keywords?
The answer: keywords with the word “best” in them.
Here are some examples:
- In finance, it could be the best credit cards, best auto loans, or best home insurance.
- In tech, the keywords could be the best laptop of 2020, best VR headsets, or best Mac accessories.
- In marketing (like my blog), it could be the best email marketing software, best web hosting, or the best website builders.
- In travel, keywords could include the best travel insurance or best coworking spaces.
These “best” keywords are searched by people looking for product reviews.
They want to read a blog with in-depth content on the “best” something before making a purchase (and they aren’t ready to go right to a company’s website and buy something yet.)
Think about it.
If you’re searching for a new laptop, you might type in “best laptop of 2020.”
Google this term right now and look at the top 10 results.
Every single website in the top 10 results is an affiliate. Notice how there are no actual companies selling laptops. There’s no Best Buy, Walmart, Dell, or HP – only affiliates recommending laptops.
Now try Googling “best credit cards.” What do you see?
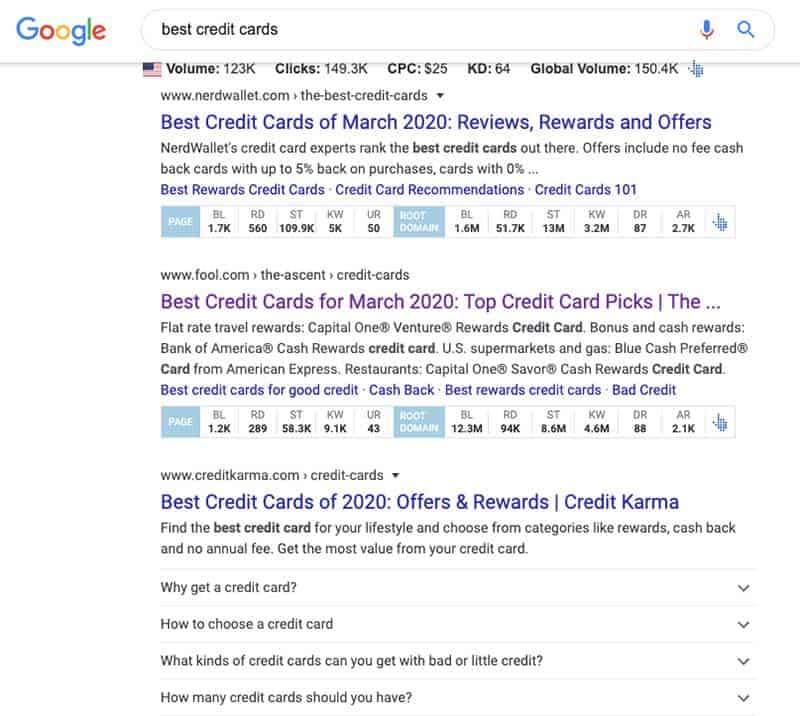
Again, every single top 10 result is an affiliate blog.
Why do these affiliate sites
outrank brands selling the products?They write long-form, in-depth review articles that search engines (and readers) prefer.
In fact, 49% of consumers depend on influencer reviews and recommendations.
You’ll begin to realize is that most profitable blogs are, in fact, review websites making affiliate commissions from list posts.
And the truth is, these recommendations are primarily based on how much money the affiliate blog is making from their top recommendations – not the actual quality of the product itself.
Once you grasp this when you learn how to start a blog, you’ll begin to see affiliate sites everywhere.
So now when you think of blogging and planning your niche, replicate sites like these:
- Finance: NerdWallet, Fool.com, WalletHub, CardRatings.
- Tech: Tom’s Guide, Techradar, Wire Cutter, CNET.
- Travel: Nomadic Matt, The Points Guy, Expert Vagabond.
- Business: The Balance SMB, FitSmallBusiness, FinancesOnline.
I think that the most profitable niches right now for new blogs are finance, tech, travel, business, and marketing.
But there are tons of other options.
We’ll get to keyword research later, but know that your blog should have affiliate marketing revenue potential.
Let’s move onto the next weapon in your blogging arsenal – your professional leverage.
3. Use Your Professional Leverage.
After uncovering a lucrative audience to provide value to, the next step of learning how to start a blog is uncovering your strategic advantages.
Ask yourself:
- What is my current level of professional experience?
- What connections do I have in my industry?
- Can I leverage this experience into a profitable blog?
- If I could pitch any website in the world to contribute a guest post, who would choose me from the start?
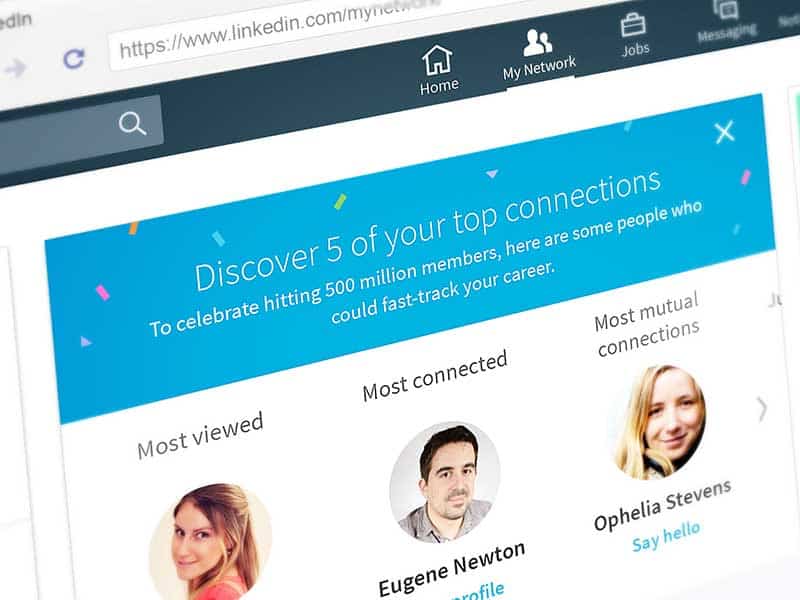
Source: linkedin.com
To build a truly successful blog, you first need to build influence.
And to build influence, you need to step outside of your comfort zone and leverage your connections, professional experience, and everything at your disposal like never before.
With a blog, you’ll also be performing a lot of outreach to make new connections. This includes building relationships so you can guest post on authoritative sites in your niche to get relevant, high Domain Authority (DA) backlinks.
And when you’re just starting, you may not have many connections or published content out there. You might say: “Why would anyone feature me?”
This is where leveraging your professional background helps tremendously.
For example, if you’re a photographer, you might have a base of clients, contacts from local meet-up groups, and even
know photography influencers that you met in the past. If you can leverage these contacts in the future, you can accelerate the growth of your blog.Use every advantage you have at your disposal. These advantages will help you build early momentum with guest posts, backlinks, and social shares.
Now let’s move onto the final (and most important) factor in choosing your niche.
4. Keyword Research.
To me, keyword research is the most important step when choosing your blog’s niche.
It’s very simple. Are people searching for the things you want to write about?
Every individual blog post needs to focus on one target keyword. And if no one is searching for it, you’ll never get traffic.
It’s a fact: You need to have a basic understanding of keyword research and search engine optimization (SEO) so that your blog can rank and get traffic.
Why?
People are online six and a half hours a day.
People search Google 63,000 times every second. That’s 3.8 million searches per minute, 228 million searches per hour, and 5.6
billion searches per day.Plus, organic traffic from search engines is way more valuable than social media traffic. Rather than aimlessly browsing the web, people perform high-intent searches to discover solutions to their problems.
The good news is that there are SEO tools to understand all of this search data. With tools like SEMRush and Ahrefs, you can view individual keyword metrics, including:
- Monthly search volume: how many times a keyword is searched for in a given month.
- Keyword difficulty: on a scale from 0 to 100, how difficult is it to rank for that keyword based on the competition.
- The average cost per click (CPC): this is how much the keyword is worth if you were to create a PPC ad for it and pay for the click. It’s a good indicator of the keyword’s value.
So what do you look for?
You want to find keywords with high volume and low competition.
Here’s how I rate these competitive metrics.
Monthly Search Volume:
- 0-1,000: Low
- 1,000-5,000: Low/Medium
- 5,000-20,000: Medium
- 20,000-100,000: High
- 100,000+: Very High
Keyword Difficulty:
- 0-20: Low
- 21-50: Medium
- 51-75: High
- 76+: Very High
On my site, there are two main types of keywords I target when it comes to SEO: high-volume/high competition and medium volume, low competition.
1. Revenue Drivers: Medium Volume, Low Competition, High CPC Keywords
The first keywords new blogs should search for are medium volume, low compet
ition keywords.For example, let’s take a look at my post on Webinar Software. I published this post and became #1 for this keyword within four months.
- Target keyword: webinar software
- Monthly search volume: 4,300
- Keyword difficulty: 22
- Average CPC: $25.00
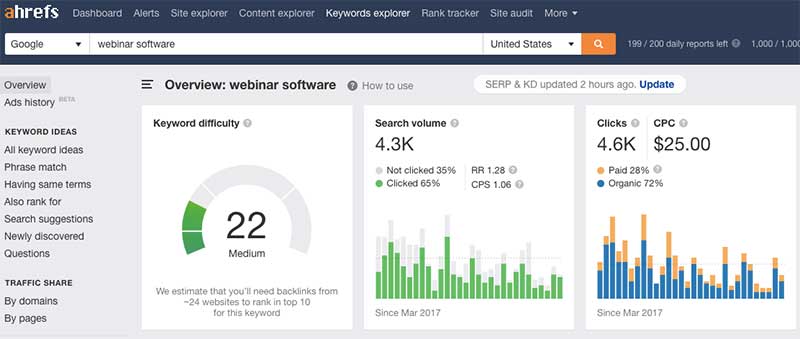
4,300 is not a very high monthly search volume, but since position 1 gets over 33% of traffic, I could expect to get 1,419 visitors/month to my blog for position one on this term.
Plus, with a low keyword difficulty of 22, this term should be relatively easy to rank for (in fact, I got to page 1 just a few days after publishing the blog post).
Finally, with an average CPC of $25, it is a valuable, high-intent search term.
One quick side note on keyword search volume:
While the keyword webinar software gets 4,300 searches per month, there are thousands of potential variations of this keyword – for example, best webinar software, webinar tools, webinar platforms, etc. This post can rank for all of these variations, too, so I typically double or even triple my volume estimates based o
n the main target keyword.Pro Tip:
Using Ahrefs Also Rank for Report, you can view keywords that the top-ranking pages for your target keyword also rank for in the top 100 search results. This allows you to find less obvious keywords that you can also include in your post’s copy and subheadings.
The key to finding relevant keywords from this report to use for your blog is to search with more specific queries. For example, instead of “cooking,” use “vegan recipes.” Or “email marketing services” instead of “marketing.”
How to find this type of keyword for your blog:
Use a tool like Ahrefs and filter the results. Set the monthly search volume filter to a minimum of 1,000 and the Keyword Difficulty filter to a maximum of 50.
What these keywords are good for:
These keywords should make up the bulk of your posts and be the main revenue-drivers for your blog. The key is to find a good amount of long-tail keywords with medium volume and low competition in your niche.
If these keywords are preceded by terms like “how to” and “best,” you’re well on your way to finding a profitable niche and solving a pain point.
2. Blog Builders: High-Volume/Medium-High Competition
The second type of keywords that I target are super high-volume terms that aren’t as easy to monetize but can bring in a lot of traffic.
For example, take my post How to Make Money Online.
- Target keyword: how to make money online
- Monthly search volume: 103,000
- Keyword difficulty: 55
- Average CPC: $2.00
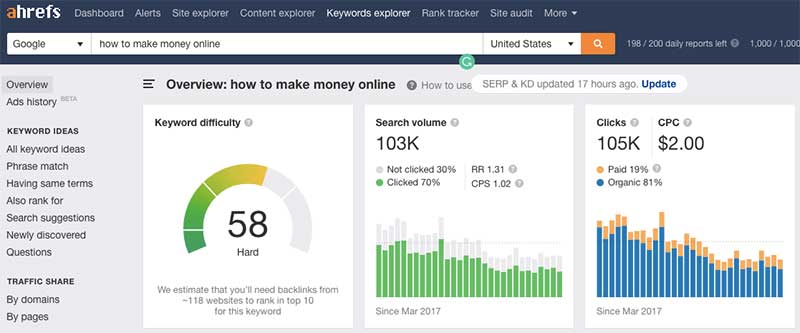
First, this keyword has a 25x higher volume than webinar software. With high volume and all of the potential keyword variations, ranking in the top 5 positions for this term could bring in 30-65,000 visitors/month.
However, t
his keyword also has a lower search intent than webinar software. With the keyword webinar software, we know what the searcher wants.With how to make money online, this user could be interested in anything from starting an online business to podcasting or coupon clipping – we just don’t know.
So that’s why it’s average CPC is only $2.00 – it’s vaguer and harder to monetize. However, this keyword can pull in lots o
f traffic and get readers to click your other higher-revenue blog posts.How to find this type of keyword for your blog:
Use a tool like Ahrefs and filter the results. Set the monthly search volume filter to a minimum of 20,000 and the Keyword Difficulty filter to a maximum of 75.
What these keywords are good for:
These keywords should make up 5-10 pillar blog posts that you put a lot of time and effort into. While these high volume keywords won’t generate immediate revenue, they bring in a ton of traffic to your blog and can increase the size of your email list.
3. Summing Up Keyword Research
A blog needs a mix of both high volume keywords and high intent keywords.
This entire strategy comes into play when planning your blog’s first five posts. For example, a few posts should be
large how-to guides with high search volume to bring in readers. And a few other posts should be low volume/high intent keywords that can be monetized.Here are some of the tools you can use for your keyword research:
Wrapping Up Picking Your Niche.
Your niche needs audience revenue potential, affiliate marketing potential, professional leverage, and keyword research.
The niche selection section above is longer than most other guides on how to start a blog because early planning is one of the most important keys to blogging success.
Let’s start your new blog.
2. Write Down Your Blog’s Goals.
Everyone knows the famous quote by Antoine de Saint-Exupéry, “A goal without a plan is just a wish.”
This is true when starting a new blog.
After choosing your niche, you need a way to keep track of everything — not just your to-dos and content ideas, but also your goals, ideas, and motivations.
The key during this stage is not to overcomplicate things.
When I was starting this blog, I kept track of everything in one simple document.
Your Blog’s Goals.
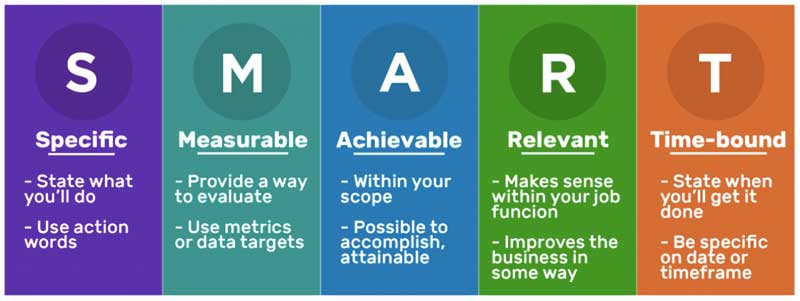
It’s time to think big and write down what you want to accomplish with your blog in the short and long term. These should be SMART goals – Specific, Measurable, Attainable, Relevant, and Timely.
Source: fitsmallbusiness.com
Here are a few examples from my document when I started planning my blog:
- Write and publish my first five blog posts of 2,000+ words by January 20
- Complete my About Me page by January 25
- Publish five guest posts by February 1
- Get 1,000 blog site visitors/month by February 15
- Get 250 people in my email list by February 15
- Obtain 100 backlinks by March 1
As you can see, these are all short term attainable goals with clear due dates.
Your Blog’s Profile.
In your planning document, you need a place to keep track of your random ideas and unique selling points to hone in on your messaging over time.
Sections here may include:
- Your unique value proposition.
- Your blog’s headline and sub-headline.
- What is the problem you solve?
- Your blog’s “elevator pitch” – in 1-2 sentences, how would you easily explain your blog to a stranger?
- Your ideal customer personas.
- What are the main categories for your blog?
- Future content ideas with target keywords and search volume.
- Your blog post categories.
That’s it.
The key is to make this a living document and update however you see fit.
To plan a blog, set some simple goals, and write things down to better hone in on your blog’s message, and understand who your audience is.
Remember, when learning how to start a blog, you need to plan your niche and goals like a business from day one.
Why Are You Starting a Blog?
Your goals need to tie to your why.
We all start blogs for different reasons – to make money, to create an audience around a topic we’re passionate about, to build a professional resume, to enhance our writing skills – the list is endless.
But it goes deeper than that.
For example, if you want to learn how to start a blog to make money, it could be for any number of different reasons:
- The ability to increase your nest egg for retirement.
- The dream of quitting your full-time job and saying goodbye to the 9-5 grind.
- Spending more time with your family.
- Saving for an extra vacation every year.
Go deep into your “why statement” to understand not only your goals but also what accomplishing your goals will mean for your life.
For me, I always dreamed of making enough money to avoid the corporate rat race. I dreaded the thought of:
- Being startled awake to an alarm every morning.
- Driving to work stuck in bumper-to-bumper traffic.
- Being bossed around by a micro-manager boss.
Ultimately, I was scared of spending 40 hours a week doing something I didn’t really like.
So the first reason I started my blog was time freedom.
The second reason was to prove something to myself – to live up to my own expectations of what my life could be and avoid mediocrity at any cost.
And I tried and failed plenty of times
.It was only when I finally learned enough from a lot of other smart people in my digital marketing career that I found the formula to make it work.
I simply didn’t know what I didn’t know.
So I want to share with you all the things I wish I knew before I started my blog.
I also conducted my own research to understand the biggest challenges for new content marketers based on the stage of their blog’s growth. Here’s what I found:

This survey proved to me that to build a profitable blog, you need a holistic approach that starts with three main disciplines: niche selection, content marketing, and monetization.
Let’s move onto the next step in setting up your website.
Ready to launch your blog with Bluehost? Get started for just $2.95/month (63% off your hosting plan) with my link below:
3. Pick a Domain Name.
In the past, I took way too much time on this step. I scoured GoDaddy for weeks trying to find the perfect catchy, niche-specific, short, memorable dot com domain.
While this step is important, it’s probably not as important as you think.
In the past, it was possible to get exact-match keyword domain names like cuttingboards.com to help your search rankings. Today, it’s much more difficult.
While common advice is to “niche down” and choose an ultra-specific name, I recommend you choose a website name that’s broad enough to allow you to pivot if necessary.
If your focus is too narrow and suddenly you lose passion for your niche or run out of topic ideas, you’re stuck with your new domain. However, if you broaden your focus a little bit, you can expand your content and have enough fluidity to maintain consistency, avoid quitting, and better promote your website for the long haul.
In the past, I tried starting online businesses and chose ultra-specific names. When I didn’t see immediate success, I got discouraged and thought, “Well, maybe this niche isn’t for me. I should quit and try something else.”
Here’s what you could do instead: choose a broader name and worry about being specific in your posts and pages.
Here are some other things you need to consider before picking a name for your website.
1. The Price of the Domain.
You have to buy your blog’s domain name from a domain registrar company. It should cost you roughly $10/year. If you get started with Bluehost web hosting, you get a free domain name for the first year.
To get started with for just $2.95/month (and get 63% off your hosting plan), use my link below:
2. Should You Use Your Name as a Domain Name?
Blogs are living, breathing documents. They need to be given the freedom to adapt, pivot, and change over time. Personal brand domains are the smartest choice and give you the power to pivot.
If one sub-niche doesn’t work for you, you can pivot your content and adapt your blog to what’s working.
Think about it.
The #1 struggle new bloggers face is choosing their niche. Hands down – it’s not even close.
But what are the odds of a total beginner choosing the perfect niche and making it work? Very slim.
3. Domain Extensions.
Domains come with different extensions – .com, .us, .guru, .sport, .com, etc.
.us stands for the United States, .guru is used for coaching blogs, and .sport is used for sports blogs.
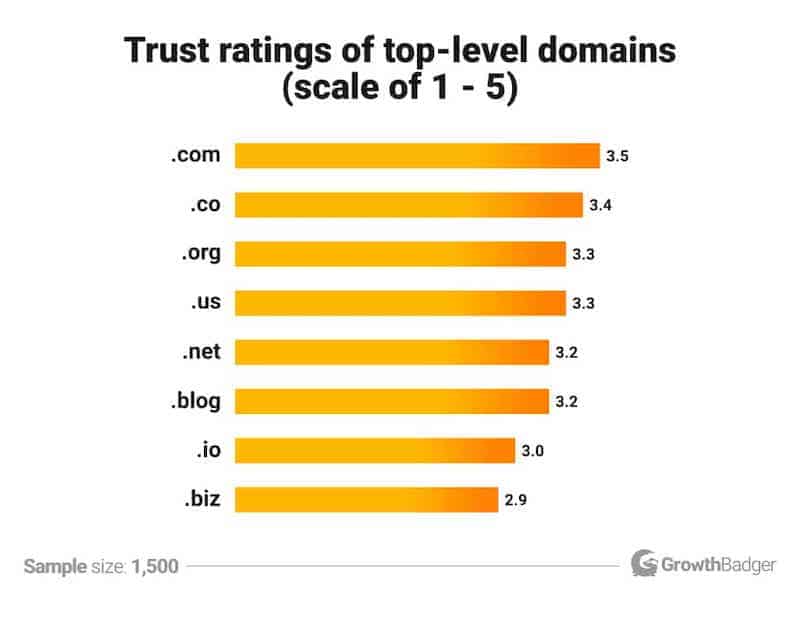
However, .com is the top-level domain that’s more inclusive and mostly favored by search engines.
Here’s how internet users perceive some of the top-level domains in terms of trustworthiness, on a scale of 1 – 5:
 Here are some other things to consider when choosing a domain name:
- Your name should not be too difficult and complex to type. It should also be memorable and aligned with your brand. That’s why a dot com extensions are an excellent option.
- Don’t confuse people with difficult spelling, so keep the name easy to spell and pronounce.
- Avoid using numbers and hyphens in your domain as it can confuse people.
- Try to incorporate a keyword that best represents your blog, if possible. It’s not as important to have a keyword in your blog name for SEO, but it might help people identify your blog’s niche right away.
Check out the tools mentioned in this article to generate your own domain – 27 Best Name Generators.
If your preferred name isn’t available, most of the tools mentioned in the article above will provide alternate suggestions.
4. Choose a Blog Hosting Company and Register Your Domain.
Every website needs a web host to store their site on a server so that people can access it online. Without a hosting account, your blog won’t be visible on the internet.

The performance of your blog relies heavily on your provider, so you should choose the best web hosting you can. A good hosting platform keeps your site up and running without interruption, provides security, and integrates with WordPress.
You should choose a host that is reliable and comes at an affordable price.
At this stage, your best option is a simple shared hosting plan. I recommend Bluehost as the easiest option when learning how to start a blog.
Plus, it has some great features:
- 99% server uptime
- High-end security measures
- High-speed servers
- An easy-to-use dashboard that comes in handy for beginners
- Numerous hosting options to choose from
- 24/7 customer support
- Free SSL certificate
- Easy cPanel dashboard
- 1-click WordPress Installation
- Recommended by WordPress as the host of choice
- Low introductory pricing
- Money-back guarantee
- Only costs $2.95/month (via my links on this page)
You can also head to my detailed review here: Bluehost Reviews 2020: 11 Reasons To Believe The Hype
Next, we’ll register your domain and choose a web hosting company to launch your blog.
Follow this step-by-step guide to register your own domain name along with your web hosting plan:
Step #1: Visit bluehost.com.
Click on the “Get Started” CTA button on the homepage.

Step #2: Choose Your Web Hosting Plan.
On the next page, you will see four shared hosting plans.
These plans include Basic, Plus, Choice Plus, and Pro.
While all these shared hosting plans are perfect for a new blog, I would personally recommend going for the Basic Plan.
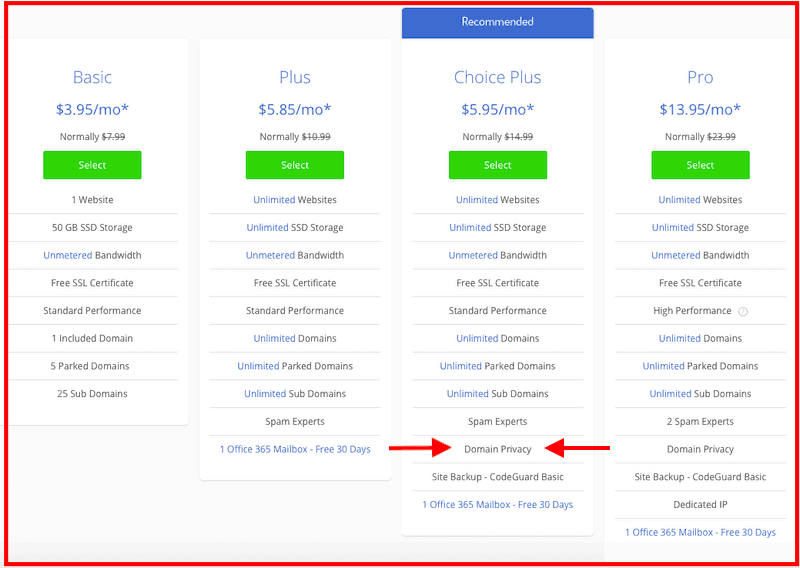
For a step up, the Choice Plus Plan offers the Domain Privacy, which will help you protect your information and guard all your confidential details, including full name, email address, residential address, and phone number.
Step #3: Enter Your Domain Name.
So, you have already selected your name (as specified in the second step).
Now, after you choose your hosting plan, you will be directed to a new page where you will be asked to enter your custom name.
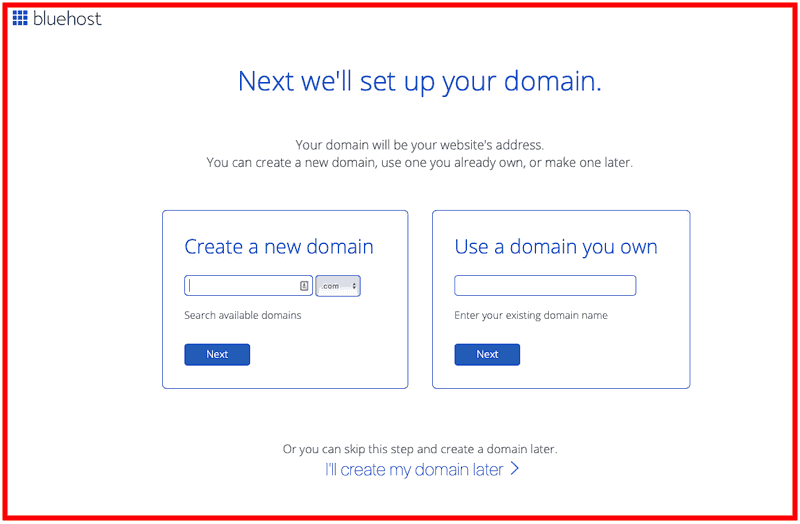
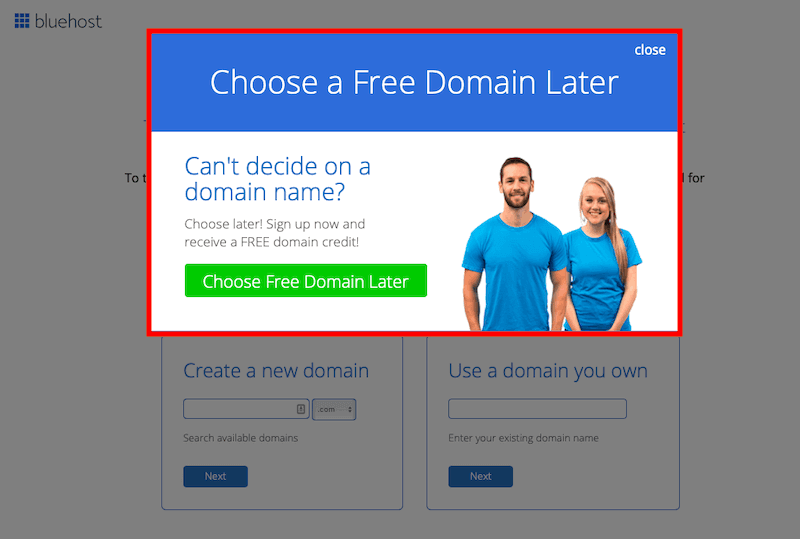
If you’ve already selected your name, then you can add the information here. And if you need a new one, you get your domain name for free for the first year.
If you need more time to come up with a website name, you can always sign-up and choose your domain later.
Next, you’re prompted to create your account, which is the final step of the process.
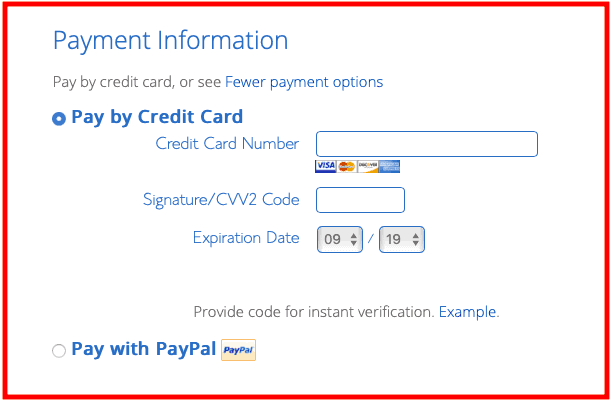
Step #4: Enter Your Details.
Here are the “Account Information” details you need to enter to create your account.

Make sure to enter the correct details, including your first and last name, business name if applicable, country, address, etc.
Upon scrolling down, you’ll see the “Package Information” section.
It includes selecting how long do you want to opt for the plan and how much advance you are willing to pay.

It allows you to pay 12, 24, 36, or 60 months upfront and gives you better pricing for longer terms. If you are sure that you will be running your blog for a long time, then I’d say go with the “Prime 36 Month Price” to get the lowest possible monthly price.
You can also get a low upfront payment by paying annually instead of monthly.
In the screenshot above, there’s another section called “Package Extras.”
You can uncheck Codeguard Basic and SiteLock Security. These are unnecessary and can be replicated with other free WordPress plugins.
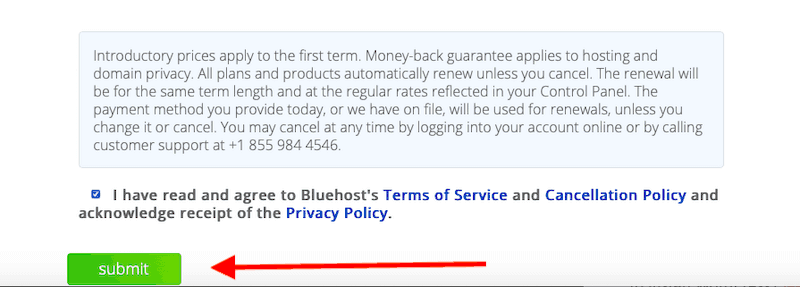
Finally, pick your payment option. You can choose to make the payment via credit card or PayPal.
That’s all it takes to sign up!
Ready to launch your blog? Get started for just $2.95/month (63% off your hosting plan) with my link below:
Step #5: You have successfully registered your hosting plan.
Congratulations – you’ve set up your hosting for the first time.
You’re now signed up with Bluehost, which means you’ve completed a vital first step in learning how to start a blog.
Let’s continue.
Step #6: Create your account and set your password.
You’re almost done. After receiving an email to confirm your account, enter your domain name, and create a password for your account.
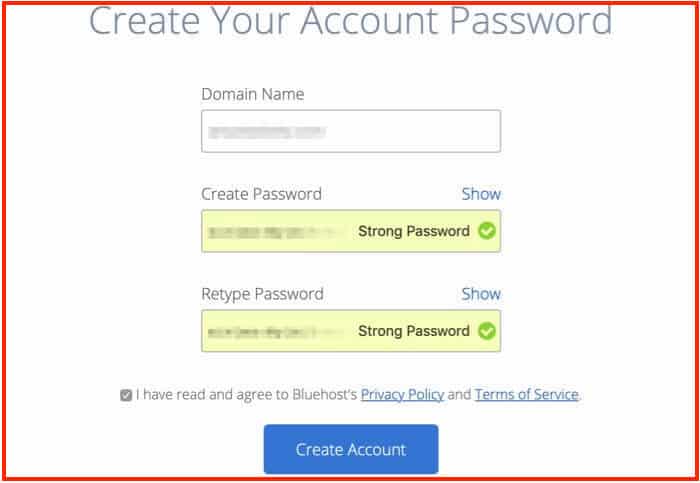
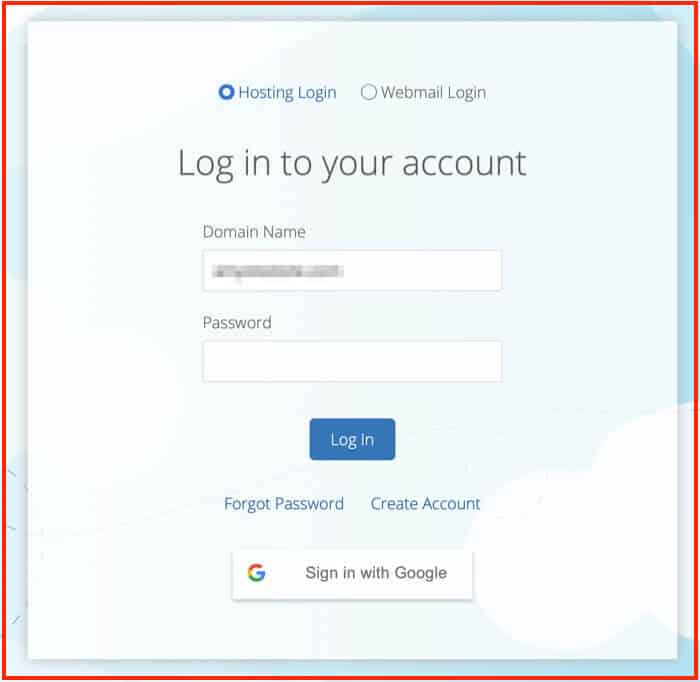
Step #7: Log in to your account.
Use the password you just set to log in to your account. You can also sign in with Google if you prefer.
And you’re all set! Now that the web hosting setup is out of the way, it’s time to move on to installing WordPress and getting
into your blogging dashboard.5. Install WordPress as Your Blogging Content Management System (CMS)
After getting through the first phase of planning your blog and choosing web hosting, the next step is to choose WordPress as your blogging platform.
Your blog platform, also known as a Content Management System (CMS), is where you will be writing, customizing, and publishing your blog posts. Naturally, you are going to need something user-friendly, powerful, and affordable.
There are paid and free blogging platforms available to choose from.
Here are the top blogging platforms and their usage:
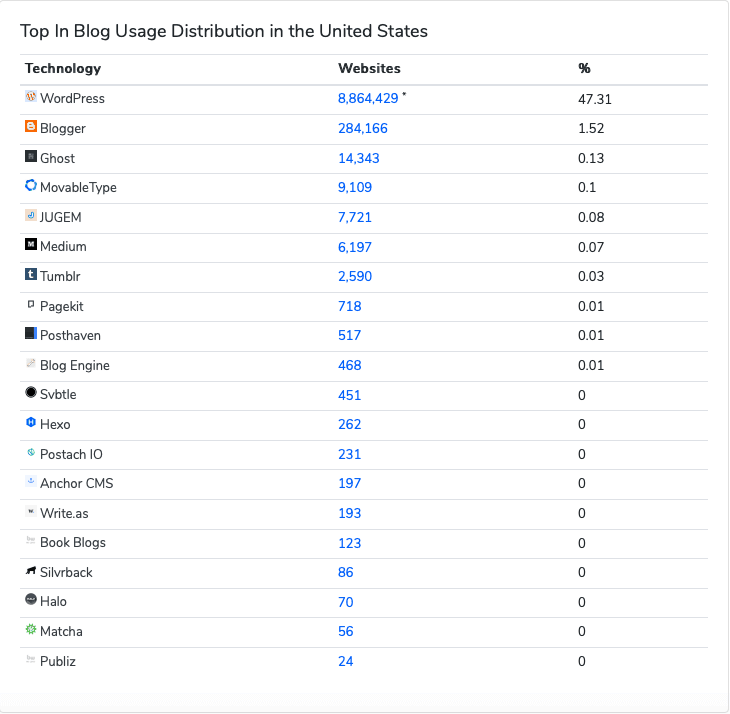
Most people run their blogs on WordPress, which is apparent from the stats above.
WordPress also offers multiple free plugins, themes, and various ways to extend the functionality of your blog.
You also don’t need to have any coding knowledge to get started.
With most hosts, you simply use 1-click install WordPress, and you’re taken to your WordPress dashboard.
However, before you get started, you should know the difference between the .com and .org versions of WordPress.
WordPress.com vs. WordPress.org – Which one should you choose?
Here are some of the common differences between the two:
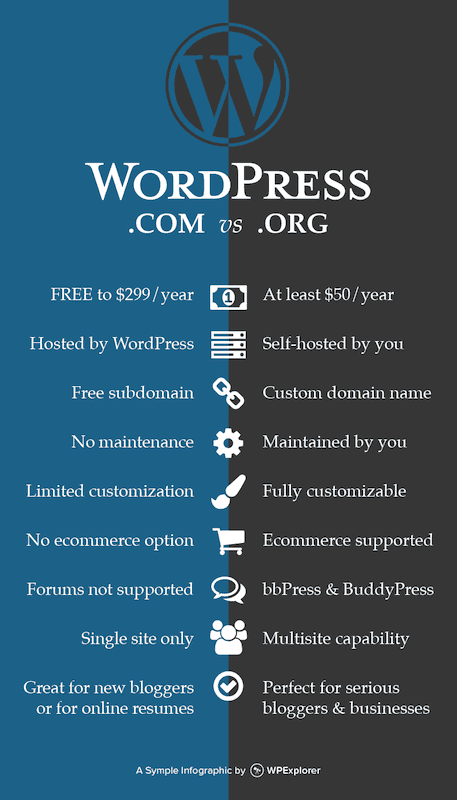
If your eventual goal is to make money through your blog, then think no further before selecting the self-hosted WordPress.org.
A blog is an extension of your brand and needs to be something that you own outright. You shouldn’t rely on a subdomain or blog site like Tumblr to host your blog.
The .com version has minimal options and doesn’t allow you to tweak settings or pick a custom domain name. (Eg: yoursite.wordpress.com). If you do want to use a custom name, you would have to pay extra.
It also comes with limited monetization and analytics options. On top of that, with the .com option, you can’t upload plugins and themes from outside of WordPress.
WordPress.org, on the other hand, gives you complete freedom to download tools and themes from different platforms and fully customize your blog’s design.
With Bluehost, you can install WordPress and run your own blog in a matter of minutes.
Here’s how to do it.
Install WordPress with One-Click Installation.
Bluehost automatically one-click installs WordPress right from your hosting dashboard.
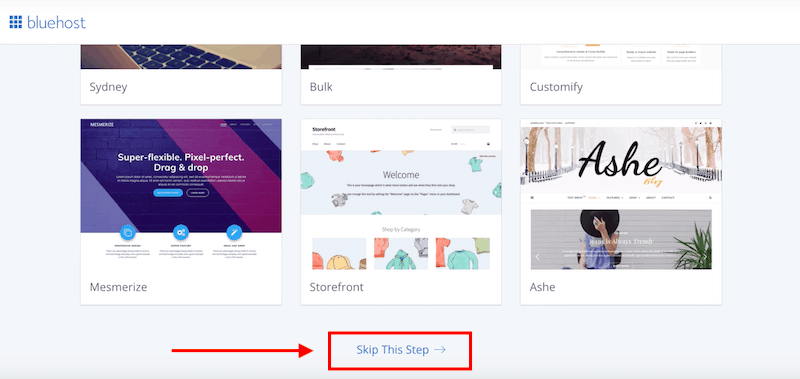
After you’re done setting up your account password, you’re prompted to pick a theme.
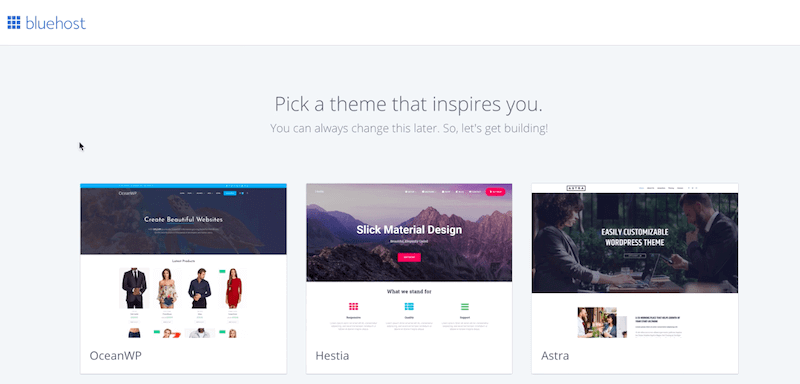
There are plenty of attractive free WordPress themes to choose from, including free blog themes.
However, if you want to pick your theme later, you can skip this step for now by clicking on the “Skip This Step” option at the end of the page.
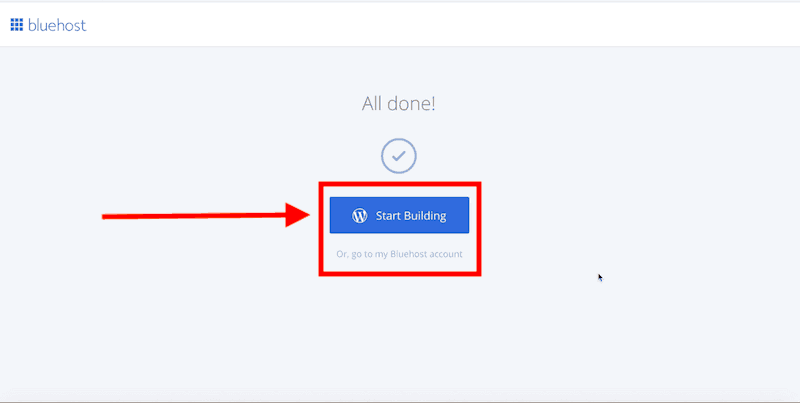
From here, you’re directed to a new page where you need to click on the “Start Building” option.
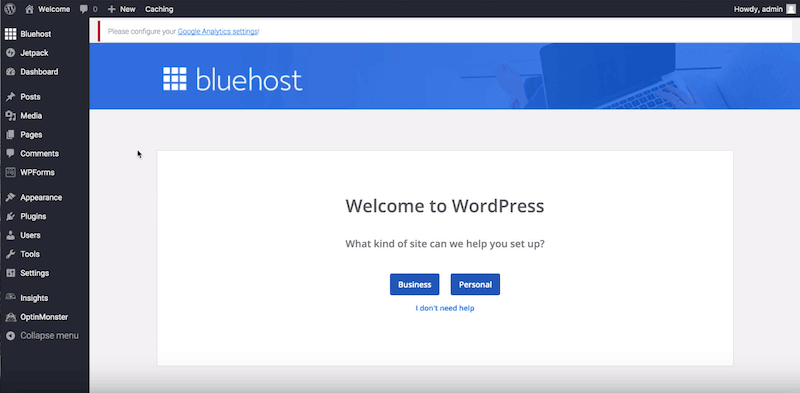
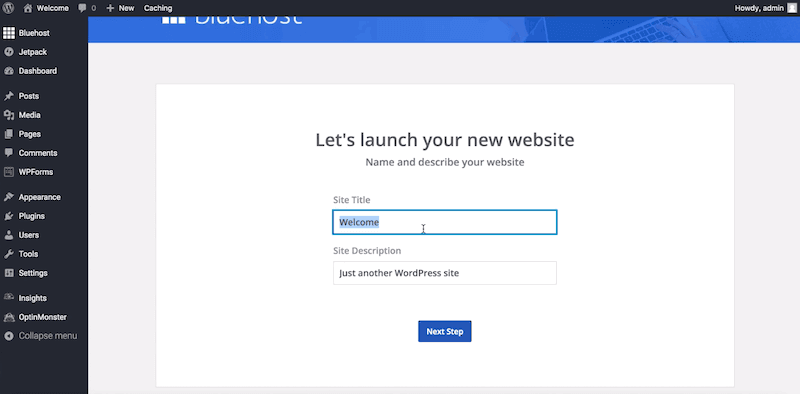
Next, select what type of site you plan to create, and WordPress will help you in the process with prompts. You can also just click “I don’t need help” to go right to your dashboard.
Finally, enter your “Site Title” and your “Site Description.”
From here, you are directed to a page to decide the layout of your blog. You can either create a custom home page with the page editor or simply host your recent blog posts on your homepage.

From here,
spend some time making yourself familiar with the functionalities of your new WordPress blog. Make sure to test out all the features and play around with different themes to pick the one that best suits you.This brings us to our next step – choosing a theme.
Are you ready to start your blog? Get started for just $2.95/month (63% off your hosting plan) with my link below:
6. Pick Your Blog’s Theme.
Now that you have a WordPress account, you need to choose your WordPress theme.
A WordPress theme is a collection of templates, files, and stylesheets that dictate the appearance and design of your WordPress-powered website.
Right now, your blog might look something like this:
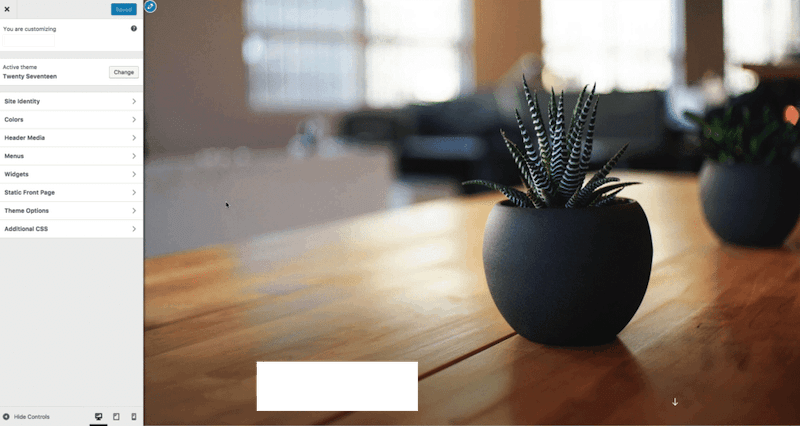
This is the default WordPress theme, and on the left side is your appearance customization menu that helps you customize your theme.
While this base theme isn’t the best, it can be used to get familiar with the appearance editor.
In the theme appearance editor, you can edit:
- Site identity – your business name, logo and other navigation items.
- Colors – you can choose the colors for fonts, buttons, blocks, and other items.
- Menus – you can edit the placement of your menu navigation and which pages to include.
- Additional CSS – this is a place where you can place custom CSS instead of messing with your theme editor files.
There are some blog design principles to keep in mind.
For example, fonts should be between 14 and 17 points, legible, and easy to read. You should also have menu navigation that looks good on mobile and desktop.
Websites with a poorly organized layout are difficult to navigate and impair your blog’s user experience.
Remember, you don’t necessarily have to spend money to install a paid theme if you find a free one you like. However, make sure it looks nice, loads quickly, and readers can access information easily.
Finally, don’t overdo the design – a blog should be highly-functional and uncomplicated.
Install A New Theme For Your Blog.
Here’s how you can install a new theme for your WordPress blog:
First, log in to your WordPress account (admin page).
You can always access your WordPress login page by going to yourdomainname.com/wp-admin.
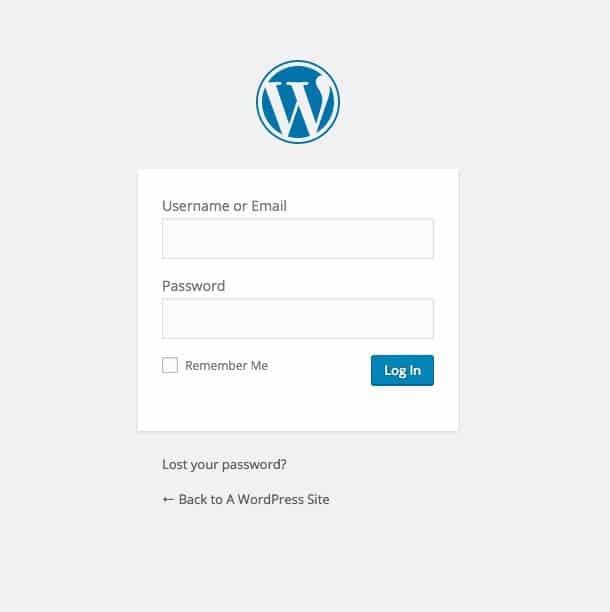
Next, add your WordPress login credentials.
Once logged in, your WordPress dashboard looks something like this.
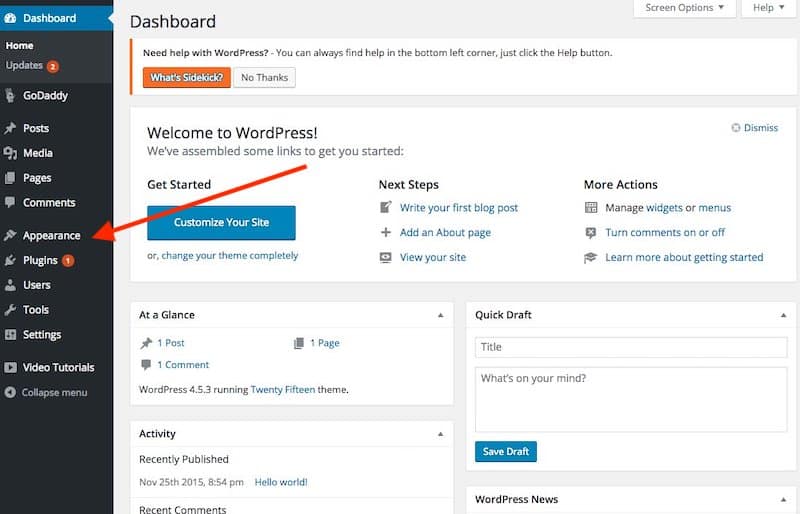
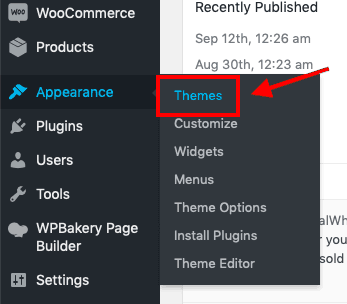
Here, click on the
“Appearance” option from the sidebar menu.Next, select the “Themes” option from the “Appearance” section.
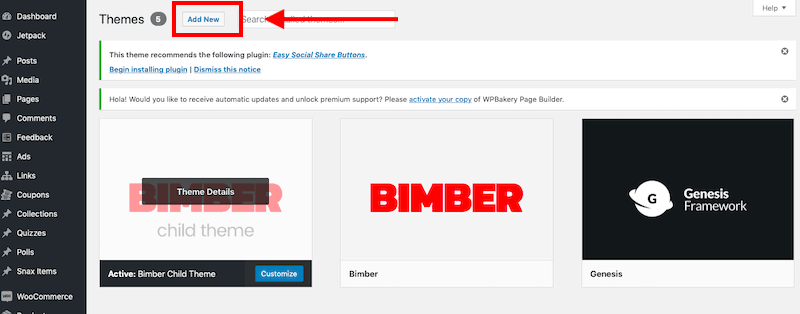
To search for the theme options WordPress offers, click the “Add New” button at the top of the page.
As you can see below, there are a ton of free themes to choose from.
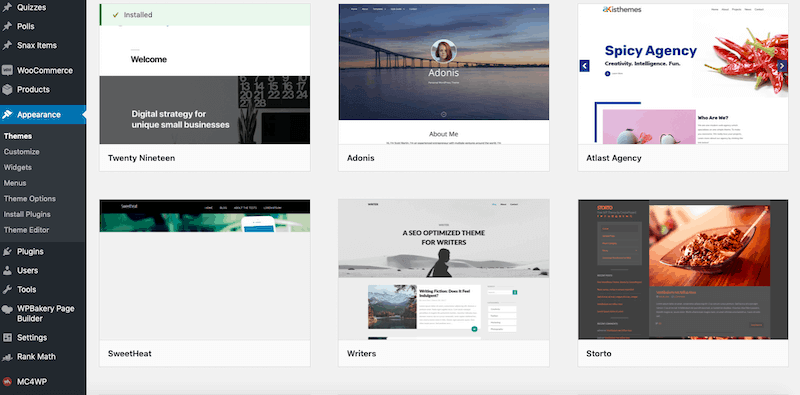
You can scroll down and preview as many themes as you want before picking one for your blog.
You can also filter out the themes based on three categories: “Subject,” “Features,” and “Layout.”
Here’s what the filter option looks like:
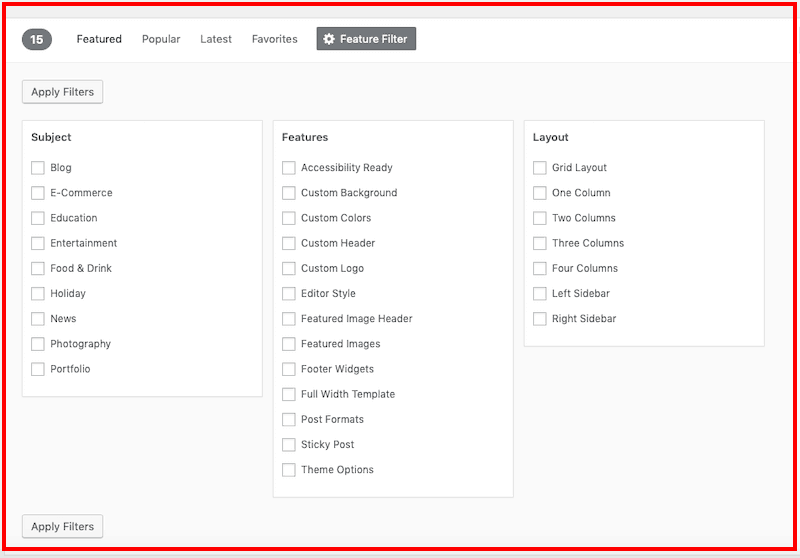
Apply the filters to narrow down your options. You can then click on a thumbnail and get an instant preview of what your final blog is going to look like.
If you like a particular theme, you can click on the “Install” button.
If you don’t want to use a stock WordPress theme, there are plenty of sites like GeneratePress, StudioPress, and CSSIgniter that offer paid themes you can buy. When you buy a theme, a zip file is sent to you via email.
To install this external theme, all that you have to do is go to “Appearance” – “Themes” and click “Add New,” upload the zip file and click install.
Congratulations, you now have a WordPress site with a new theme installed.
Ready to launch your blog and follow along with this guide? Get started for $2.95/month and get 63% off your blog hosting plan:
Extra Tips on Choosing the Right Theme.
- Read the descriptions of the various WordPress themes to get an idea about their features. This will help you get an idea of whether the theme will be compatible with your niche or not.
- Choose a responsive theme that works well on both desktop and mobile devices (most of them are).
- WordPress also allows users to give ratings to their themes – make sure to check out the reviews to get a feel for the quality of the theme.
- Before installing a theme, make sure to check its demo or preview to know what it’s going to look like.
You can also install a large number of WordPress themes from other popular sites, such as:
- Themeforest.
- StudioPress.
- Thrive Themes.
- Elementor.
- Elegant Themes.
- CSS Igniter.
Free, Premium, and Custom Themes.
There are many free blog themes available on WordPress. However, sometimes these come with limited design options.
That said, you can always start your blog with a free theme and then move on to a more personalized one after your content is up. As long as it loads fast and
allows you to start publishing content, there’s no reason not just to get started and worry about your perfect design later.Premium themes mostly come in the price range of $30 to $500 and you can find some great blog themes from a company like Themeisle:
If you’re looking for a custom-developed theme, you can hire a developer and expect to pay $500-5,000 for your new blog.
Let’s recap where we are so far in this how to start a blog guide.
- You’ve selected your blog’s niche based on market factors, not passions.
- You know your why statement and wrote down your blog’s goals.
- You’ve chosen your blog’s name and registered it.
- You picked your hosting plan and installed WordPress.
- You installed your theme and have your blog’s framework ready to go.
That’s a lot of progress.
We’re about halfway through this guide and the following steps will cover setting up your blog for success and starting your content creation and promotion process.
Disclaimer: Please note that this post includes affiliate links which provide a commission to me at no cost to you. However, the links are for the best software and tools you need to start a successful blog. For more information, you can read my affiliate disclosure in my privacy policy.
7. Install Your WordPress Plugins.
Since WordPress is open-source, you can customize your site in an endless amount of ways.
And this starts with WordPress plugins.
These are sets of tools that integrate with your website and extend its functionality and feature set.
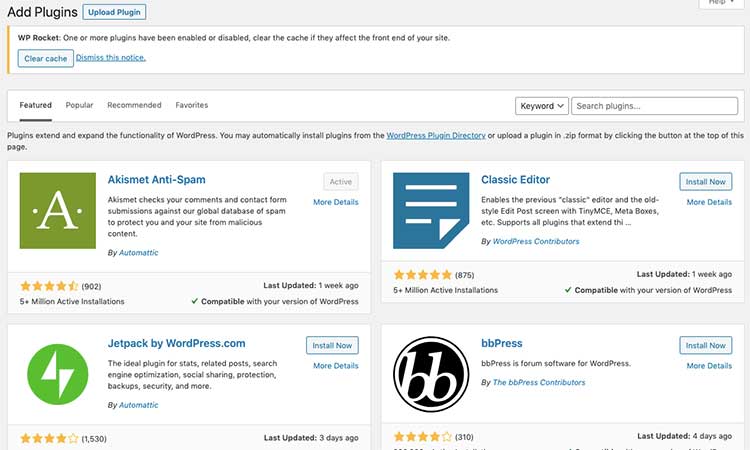
WordPress offers thousands of plugins with different functions, including everything from email marketing and calendar integration to opt-in forms and SEO tools. These tools make learning how to start a blog
pretty easy, as they perform a lot of cool tasks without needing any coding knowledge.However, it’s not recommended to install hundreds of these tools on your blog as they tend to slow down your site and can conflict with each other during updates.
Which plugins should you add to your blog?
I curated a list of the 15 best ones to help you enhance your new blog (and the exact ones I use):
1. Asset CleanUp: Page Speed Booster.
This plugin allows you to remove certain
elements of code that aren’t necessary to load on every page. For example, my ecommerce HTML and CSS files were loading on every blog post even though I only needed them on two pages. With this tool, you can easily select which pieces of code to keep and which to remove based on pages, posts, and other types of content.2. BigCommerce for WordPress.
This is the ecommerce tool that I use to sell my digital products. I tested WooCommerce first, but it installed four extensions, slowed down my site, and had an ugly checkout experience. BigCom
merce for WordPress launched in December 2018 and runs via an API – so you handle all of your content in WordPress and your backend ecommerce in BigCommerce.3. Classic Editor.
If you’re running into issues with the new Gutenberg editor, you can roll back to the Classic Editor.
4. Easy Table of Contents.
This plugin allows you to easily add a Table of Contents into any page or post. The plugin will appear underneath your pages/posts, and you can select if every H2, H3, or any other header should be automatically added to the Table of Contents.
Tables of Contents are important for a few reasons: they keep users engaged with the page (by clicking around) and help with
user experience. I often have a Table of Contents at the top of my new posts going to each section, then a “Back to Top” widget in the bottom right corner so that users can easily go back to the Table of Contents.5. Elementor Pro.
Elementor Pro is the best WordPress landing page builder, and it’s the tool I used to create my home page and a few other pages. They have a free version of Elementor, but the Pro version takes it to the next level with much better templates.
While the new Gutenberg block editor adds a lot of built-in functionality, if you’re struggling to build pages, Elementor Pro is a good option. You can get started with Elementor Pro for $49/year.
6. Extended Widget Options.
Widgets are areas on your WordPress site that aren’t directly pages or posts. For example, sidebars, footers, and homepage sections can be considered widgets. Extended Widget Options allows you to expand the functionality of your widgets to make them more useful.
For example, I use this tool to make some of my sidebar banners sticky so that they scroll down the page with the reader.
7. GDPR Cookie Consent.
This is a plugin that can make you GDPR
compliant and make sure that you provide a popup highlighting how you use cookies to readers in the EU.8. Mammoth .docx Converter.
I use this plugin to convert documents into WordPress posts automatically. Since I get a lot of my initial first drafts written for me, I download them as a .docx file and insert them into my posts/pages with this plugin. The Mammoth .docx Converter will appear underneath your posts/pages, and it’s as simple as uploading your file and clicking “Insert into Editor.”
One small detail is that you’ll want to make sure your document’s images have both names and alt text before uploading into WordPress.
9. OptinMonster.
OptinMonster is hands down the best email opt-in plugin on the market (and 100% how you joined this list). With the ability to create exit intent, modal popups,
in-content opt-ins, and more, they are the reason that my email list is growing by about 60-75 users/day.While I use their highest tier Growth Plan, you can get started with OptinMonster for just $9/month.
10. Shortcodes Ultimate.
This plugin allows you to create simple blocks of content by adding shortcodes to your site. I primarily use this to insert buttons quickly on my affiliate pages so that readers have very clear calls-to-action. Shortcodes Ultimate will appear in your WordPress page editor as a small button at the top (much like Bold, Paragraph Spacing, etc.), and when you click into it, you select your content block. With buttons, you can preview them in the editor and choose the size, color, style, and more.
11. ShortPixel Image Optimizer.
ShortPixel compresses all of your images so that they are smaller files and your pages load faster. I’ve tested lots of d
ifferent image compression tools, and ShortPixel has been the best.12. ThirstyAffiliates.
This is one of my favorite affiliate marketing tools. ThirstyAffiliates takes your random affiliate links (full of random numbers, letter strings, etc.) and cleans them up so that they look nice. For example, which one looks nicer:
A: https://thirstyaffiliates.com/?aff=29e1c59be16c852
B: https://www.adamenfroy.com/recommends/thirstyaffiliates
The second one is more clickable, leads to higher conversion rates, and can’t be stolen by malicious hackers.
13. WP Last Modified Info.
One factor in search engine rankings is recency of content – especially if you’re in niches with new information coming out. This plugin allows you to easily show the date on every page/post so that search engines understand when it was last modified. For example, with WordPress, it’s easy to show a date, but it will typically show the Publish Date, not the last time you edited it.
By giving search engines an easy way to pull th
e Modified Date, you will see this date appear in your search results, and may see a rankings boost.14. WP Rocket.
WP Rocket is an all-in-one site speed plugin that can do everything from minifying HMTL, CSS, and JavaScript, integrate with your CDN, reduce database bloat, and more. I’ve tried other speed tools like Autoptimize and had some issues with it. WP Rocket is the best, in my opinion.
You can get started with WP Rocket for $49/year.
15. Yoast SEO.
Yoast doesn’t need an introduction. If you’re not using it, then you’re missing out on a lot of great free features. I use Yoast to manage my sitemap, robots.txt, page titles/meta descriptions, and other add-ons.
Now that we covered the best plugins to install for your blog let’s move onto some unique settings to pay attention to.
8. Set Up Your Blog’s SEO.
A very
important ranking factor is the URLs of your blog posts and pages.When you add a new page or post, you see the page editor and can choose the URL after dot com. Check out the link below:
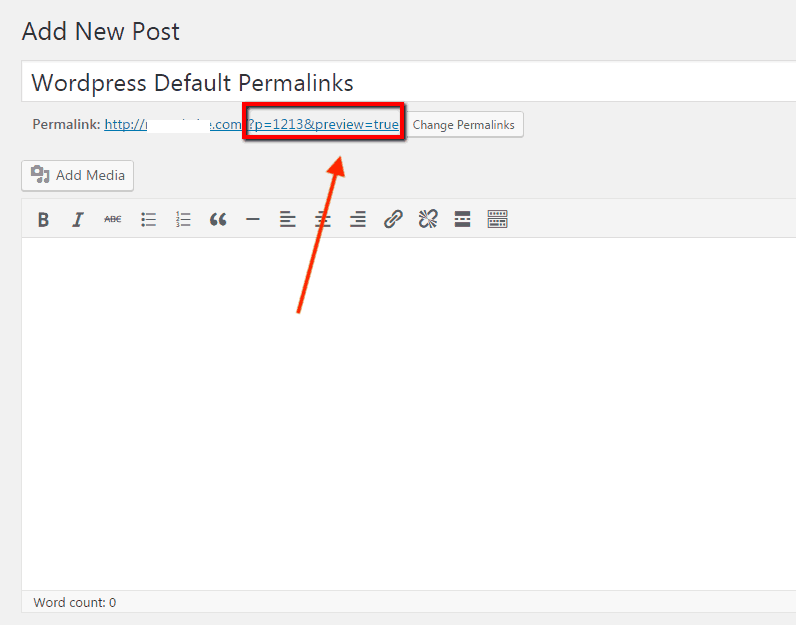
This text after the .com is what a permalink looks like.
Permalinks are static hyperlinks that will lead your audience to a specific web page.
By default, your permalink is set to “yourdomainname.com/postID.”
This not only looks unattractive but isn’t the best from an SEO standpoint.
Before you start writing content for your blog
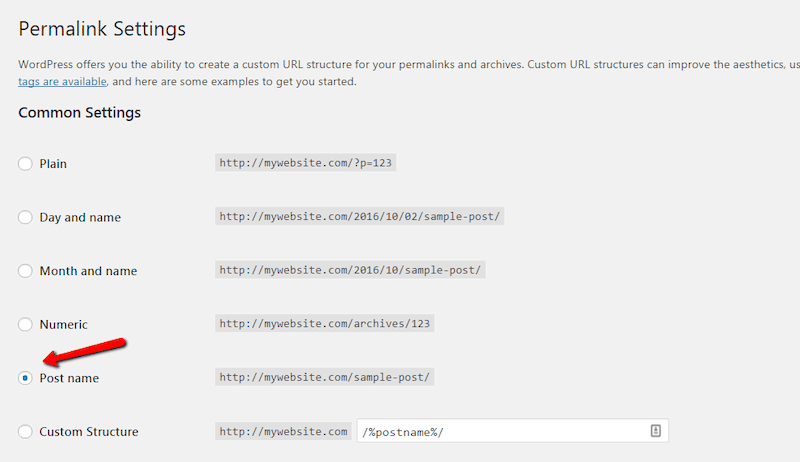
, make sure to set a specific permalink structure.From your WordPress dashboard, go to “Setting” —> “Permalinks.”
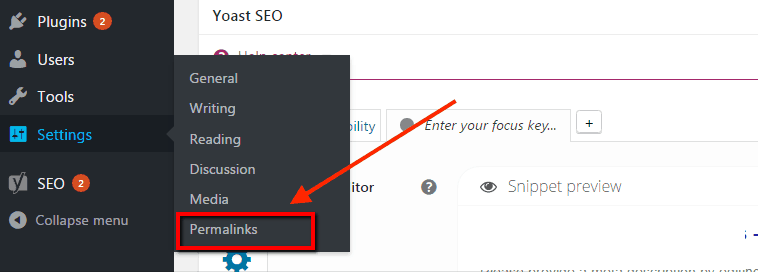
You can choose from a couple of options. Most high-ranking blogs follow the “Post name” or “Custom” structures below.
The main thing to know is that every post or page should focus on one target keyword, which should be in the area right after the dot com.
For blog posts,
this permanent URL is the only thing that needs to remain unchanged. You can change a page or post’s title, meta description, content, and headings, but the URL needs to stay the same.This is because if you get inbound links to this URL, changing it would result in a 404 error and losing that link value.
Finally, make sure to save the settings before exiting the page.
Also, make sure you set up Google Analytics and Google Search Console. These two tools are 100% necessary to index your blog and monitor your traffic. These can both be easily integrated with the Yoast plugin.
We’ve made a ton of progress so far in this guide.
You’ve learned all the technical set up of how to start a blog and have a functioning site inside of WordPress.
Now, it’s time to start creating content for your blog.
Ready to create your blog? Let’s do this! Get started for $2.95/month and get 63% off your hosting plan.
9. Create Pillar Content for Your Blog.
After completing the framework of your blog, it’s time to start writing your blog posts.
While you don’t have to be a professional writer to learn how to start a blog, it’s important to understand basic sentence structure and proper grammar. You also want to make sure that you know how to write for the web.
For example, short paragraphs, bullet points, and images help break up long, monotonous blocks of text and keep readers engaged.
You can also check out my guide to the best grammar checkers to use with your blog this year and why I use Grammarly.

Ultimately, your content creation process all begins with the keyword research we did above.
How to Add Keywords into Your Blog Posts.
Each blog post should focus on one main target keyword, and here’s where it should be included:
- Put the keyword in your blog’s permanent URL.
- Include the keyword in the title of your post.
- Add your keyword to the first or second paragraph.
- Include the keyword inside of your headings.
- Add the keyword throughout your paragraph text. A good rule of thumb is to use a 1% keyword density so that your keyword is included once for every 100 words. If your blog post is really long, this may be too many times. Use your best judgment and don’t keyword stuff.
- Add it to your meta description (optional).
You’ll see in my example below, the target keyword is in the title, URL, and first paragraph
No comments: